
Visualisation
In this module, learn about using the visualisation tools to enhance the aesthetics of the room and provide clients with a more vivid and accurate representation of their space.
This step can be done at any stage after creating a room as per your convenience and working style.
Once you click on the Visualisation tool, you will see a dropdown with the following sub tools:

- Paint: Can be used on walls, ceiling and structural entities
- Wallpaper: Can be used on walls, ceiling and structural entities
- Flooring: Can be used on the floor
- Wall tiling: Can be used on walls
The availability of these sub tools is based on the current selection and applicability as per the above list. For example, if a wall is selected then Paint, Wallpaper and Wall tile will be enabled but not the Flooring. Similarly, if the flooring is selected then only the Flooring will be enabled and not Paint, Wallpaper and Wall tile
Let us understand the functionality of each of these sub tools in detail.
Paint
It will allow you to apply Interior Company’s Asian Paints library colours on walls, ceiling and structural entities.
The steps to apply paint are as following:
- Select the wall/ceiling/structural entity in 3D mode by clicking on it.
- Select the Visualisation tool and then select Paint.
- A panel will open on the right with the Asian paints catalog. Select the Primary colour and all the shades available under it will appear. Select the desired shade.
- Click ‘Apply to Surface’
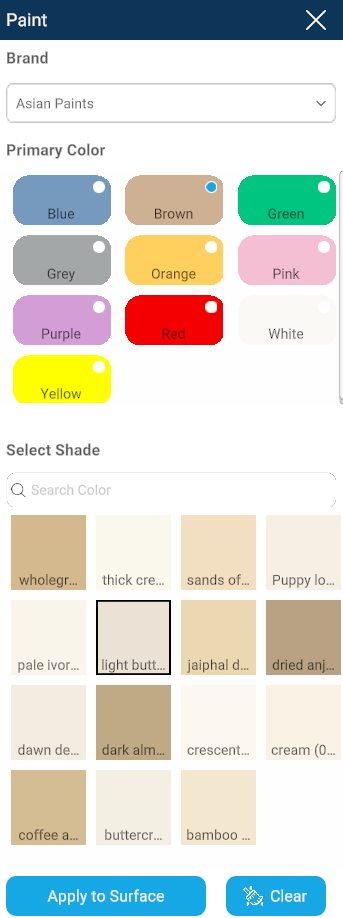
You can click on ‘Clear’ to clear any applied paint on any of the entities.
Pro tips: You can select multiple entities to apply paint on all at once by holding Shift key and clicking on the required entities.
You can use the search option to search by particular shade by its name or code.

Wallpaper
It will allow you to apply Interior Company’s Wallpaper offering on walls, ceiling and structural entities. It also allows you to import and apply any texture from your own wallpaper library as well.
The steps to apply wallpaper are as following:
- Select the wall/ceiling/structural entity in 3D mode by clicking on it.
- Select the Visualisation tool and then select Wallpaper.
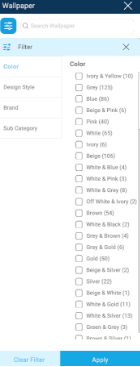
- A panel will open on the right with the Interior Company’s wallpaper catalog. Select the desired wallpaper. You can navigate to the desired wallpaper by the following means:
-
Selecting the page numbers or inputting the page number in the ‘Go to’ input box.

-
Using the search bar at the top to search via the name/code of the wallpaper.

-
Using the interlinked filters provided in the filter button at the top left to filter through various parameters.
-
- Click ‘Apply to Surface’
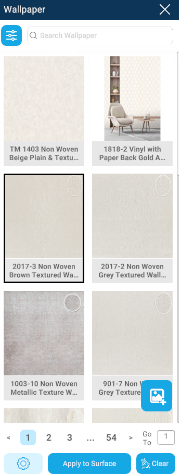
You can click on ‘Clear’ to clear any applied wallpaper on any of the entities.
You can click on the ![]() icon and change the texture scaling and offset.
icon and change the texture scaling and offset.

Pro tips: You can select multiple entities to apply wallpaper on all at once by holding Shift key and clicking on the required entities.
*You can also import and apply any texture from your own library using the import button.![]()
Flooring
It will allow you to apply flooring textures on the floor. It also allows you to import and apply any texture from your own wallpaper library as well.
The steps to apply flooring are as following:
- Select the floor in the 3D mode by clicking on it.
- Select the Visualisation tool and then select Flooring.
- A panel will open on the right with few flooring textures. Textures are categorized based on types and can be changed through the dropdown at the top. Select the desired texture.
- Click ‘Apply to Surface’

You can click on ‘Clear’ to clear any applied flooring on any of the entities.
You can click on the ![]() icon and change the texture scaling and offset.
icon and change the texture scaling and offset.
*Pro tip: You can also import and apply any texture from your own library using the import button.![]()
Wall tiling
It will allow you to apply tiling textures on the wall. It also allows you to import and apply any texture from your own texture library as well.
The steps to apply wall tiling are as following:
- Select the wall in the 3D mode by clicking on it.
- Select the Visualisation tool and then select Wall tiling.
- A panel will open on the right with few tiling textures. There are two input fields at the top called ‘Height from Floor’ and ‘Tile Height’. There will be default values of 820 and 600 in both the fields respectively. Change the values as per your requirement. Select the desired texture.
- Click ‘Apply to Surface’

You can click on ‘Clear’ to clear any applied wall tile on any of the entities.
You can click on the !![]() icon and change the texture scaling and offset.
icon and change the texture scaling and offset.
*Pro tip: You can also import and apply any texture from your own library using the import button.![]()