
Creating a Room
In this module, learn how to create a room, taking reference from an existing floor plan in Blocks.
Once you have imported the floor plan by following the steps from the previous chapter, follow the below steps:
Moving and resizing the floor plan
The floor plan image is loaded in the middle of the canvas by default. You may want to change the location and the size of the floor plan as per your preference. The steps to do the same are as following:

-
Press F on the keyboard to select the floor plan.
-
Left click on the floor plan and drag to change the location of the floor plan on the canvas.
-
Scroll the mouse wheel away from you to make the floor plan image larger and towards you to make it smaller.
-
Once you are done moving and resizing the floor plan, press F or Esc on the keyboard.
Creating the room shape
Once the floor plan is set as per your preference, you would need to create the room. The steps to do the same are following:

-
Set the preferred units of measurement (Ft/Mm).
-
Select the 'Create Room' tool and select the appropriate shape as the requirements.
-
In the dialog box that pops up, select the Room Type as per the requirement, type in the Room Name as per your preference and select the Room Category as per the requirement and click on Submit.
-
Zoom/Pan to the location on the canvas where you want to create the room.
a. Scroll the mouse wheel away from you to Zoom In and towards you to Zoom Out in the canvas.
b. Right click and drag on the canvas to pan through the canvas.
-
Move the cursor to where you want the top left of the room to be and left click and drag towards the bottom right of the room to create the room shape.
-
Input the Width and Height (Optional but useful) in the dialog box on the top middle of the canvas and click outside and press Enter or Esc on the keyboard to successfully lock in the room shape and dimensions.
This also activates the 3D mode and you can now view the created room in 3D. A default light is added to the room for illumination.
Editing the Room
Once the room is created, you might still want to make some changes to the room like changing the shape/dimensions/wall thickness/room height etc. The steps to do the same are following:
Room Height Change
As soon as the new room is created, a Property Panel for the room appears on the right hand side of the interface. This contains all the basic information for that room like room type, room name, floor area, wall area and room height. You can edit the room height by typing in the desired height in the input box and pressing Enter.

Changing wall positions/properties
Once a room is selected, click on the Edit Room tool, a drop down of 3 sub tools opens up. At this point, you can select individual walls by clicking on them.

Let us understand the functions for each of these sub tools:
Drag
![]()
This sub tool allows you to drag and shift the selected wall in its plane. To shift a wall using Drag, follow the below steps:
-
With the drag sub tool enabled, click and hold the wall which needs to be shifted. The Black Pointer cursor should change to a White Hand cursor. This indicates the wall can now be dragged.
-
Without releasing the click, drag the wall to the desired side and release once the dimension is as per requirement.

Selecting any wall will change the Room Property Panel to Wall Property Panel and now you can edit various properties of the selected wall.
Split

This sub tool allows you to split any wall vertically into 2 parts at a desired location. Select the sub tool and hover over any wall (without selecting any wall) and a green dot will appear on the pointer. This indicates the location where the split will be done. Click on the desired location to split the wall.

Join
![]()
This sub tool allows you to join any 2 connected walls into a single continuous wall. To join 2 walls using Join, follow the below steps:
- Select Join subtool.
- Select first wall by clicking on it.
- Select second wall by clicking on it.
- Click Yes on the pop-up dialog box that appears.
Changes through Wall Property Panel

The Wall Property Panel has the following information and functionality:
Dimension
Shows the wall length, cannot be edited from here.

Thickness
Shows the wall thickness and can be edited by input value from here.
![]()
Change Length
Once a wall is selected, two points appear on its either ends, named A & B. The wall's length can be changed towards either of the ends from this area by selecting Towards A or Towards B and inputting the required change in length. This is useful when you need to taper the adjacent wall.

Shift Wall
Once you select a wall, you can move the wall in its plan by inputting any definite value. You can shift the wall either towards the inside of the room or towards outside of the room. Input the required shift value in the correct input box. This is more accurate than dragging a wall using the Drag sub tool.
This also changes the length of the adjacent wall and is the suggested way to change the length of walls while keeping the wall angles the same.

Make Wall Straight
In case you have created a room with any tapered walls or changed the length of any wall to make the adjacent wall taper and want to make it straight again, use this feature to do the same. Click on the wall and then click on the check box for the required side, A or B.

Adding Structural Entities
Once a room is selected, you can click on Structural Entities , a drop down of 5 sub tools opens up. Pick the desired entity by clicking on it. The process to make Column, Beam and Slab will be the same while the process to place Niche and Cutout will be different.
To make Column/Beam/Slab, click and drag inside the room.

Once the entity is created, you can press Enter or Esc to lock in the dimensions. Click on the entity to open its property panel and change any dimensions.
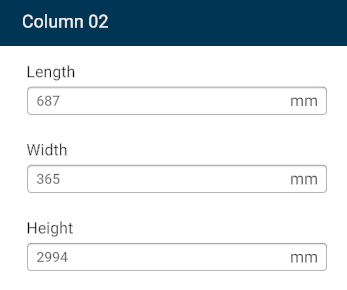


You can use the Move (M) tool to change the position of the entities inside the room. You can also use the Rotate (Q) tool to rotate the entities inside the room.
To place Niche/Cutout, hover over any wall and click at the desired location. You can place Niche/Cutout only on walls and not anywhere inside the room.
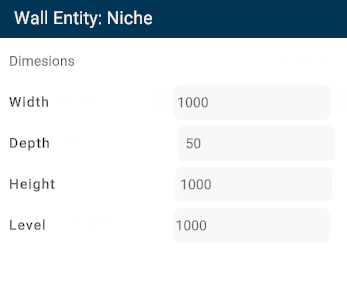

Once the entity is created, you can click on the entity to open its property panel and change any dimensions.
You can use the Move (M) tool to change the position of the above entities on a wall.
Adding Doors and Windows
Once a room is selected, you can click on the Doors and Windows tool, a drop down of Doors and Windows which further have multiple types of Door and Windows. Pick the desired entity by clicking on it and the icon for the same will appear next to the cursor. To place the door/window, hover over any wall and click at the desired location. You can place the door and windows only on walls and not anywhere inside the room.

Once the door/window is created, you can click on the same to open its property panel and change any dimensions, models and other properties.
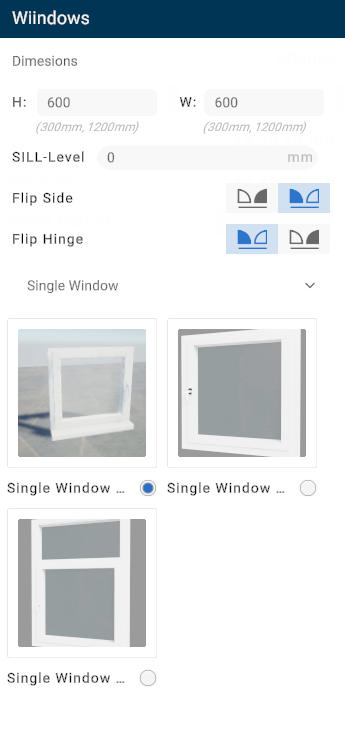
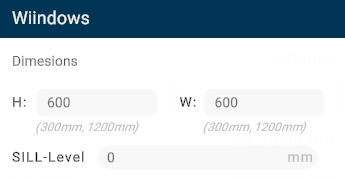
The Door/Window Property Panel has the following information and functionality:
Dimensions
Shows the Height and Width of the added model with its minimum to maximum dimension range. The dimensions can be edited from this tab within the permissible range. Changing the model will change the permissible dimensions.
It also shows the Sill level in case of Windows only and the same can be edited from this tab.
Flip Side/Hinge
This allows you to flip the opening side and hinge of hinged doors and windows.
Flip hinge is applicable only in case of Single Door/Window.

Type Dropdown
Even once added, you can still change the door/window type from this dropdown.

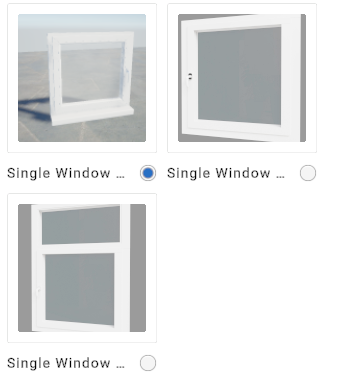
Change Designs
All the available designs are displayed in the bottom half of the property panel. Simply click on any of the models to change the design of the added door/window.
At any given time post room creation, you can switch to 3D mode to see the visualisation of the added objects.