
Enter Tool
In this module, learn how to enter a project in order to Design and learn about the interface of the Design mode of Blocks.
Opening the Canvas
To enter the Design mode of a project and start designing, follow the below steps:
Step 1: Click on the ![]() (Design) icon on the Dashboard against the project which you want to start Designing.
(Design) icon on the Dashboard against the project which you want to start Designing.
Step 2: Once you have entered the canvas, you will see a dialog box to Choose/Upload Floor plan. You must choose from three options, namely, Floor Plan, New File & Import File. This is a mandatory step and closing this dialog box will take you back to the Dashboard.
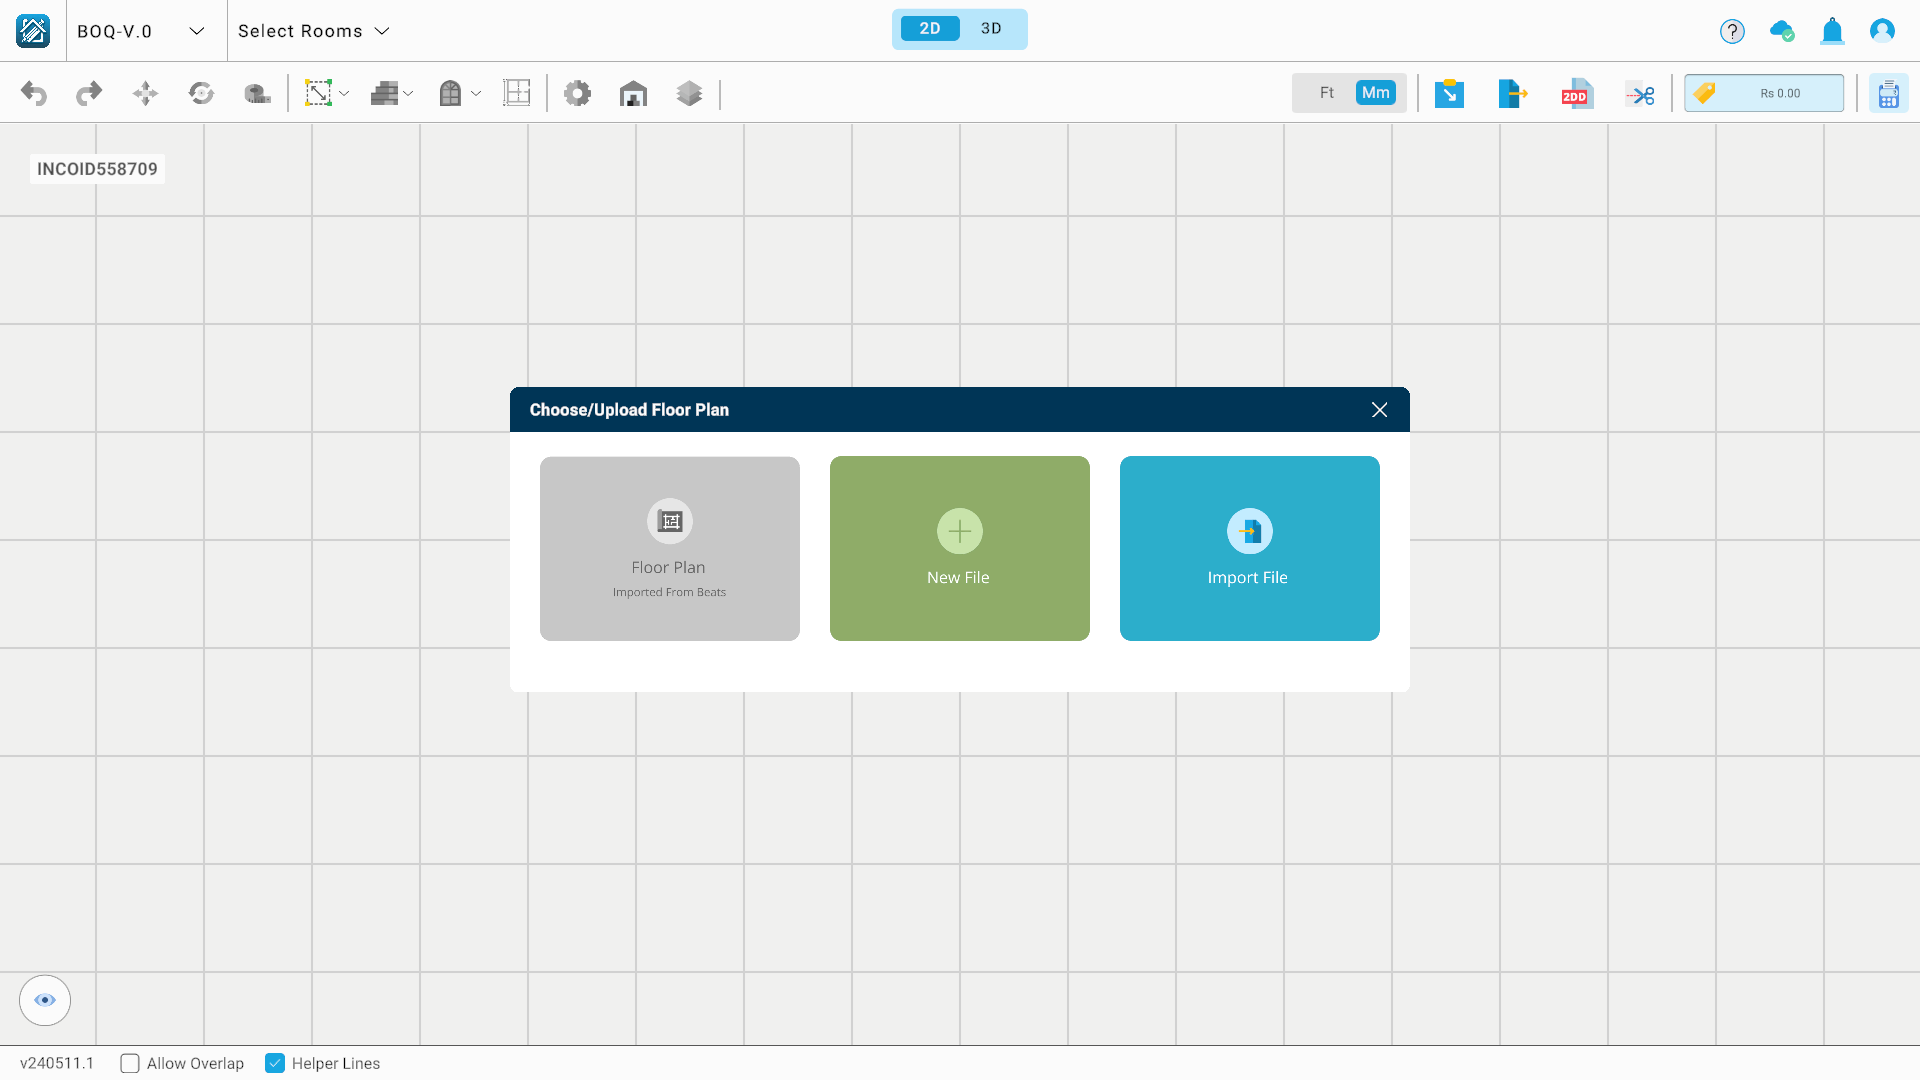
Let us understand each of these options one by one:

Floor Plan: This option allows you to Import the Floor Plan from Beats for the particular project into your 2D workspace.

New File: This option allows you to select a Blank File template or from various preset templates.

Import File: This option allows you to import a floor plan image file (jpg/png format) into your 2D workspace.
Step 2.1 (In case of Import File): In case you decide to Import an Image file from your device, you would need to locate the file and click on ‘Open’. Please make sure that the correct file format is selected in the format dropdown.

Workspace
In this section, we will go through the workspace of Blocks Design mode and understand its various sections:
Let us take the example of a Blank template.
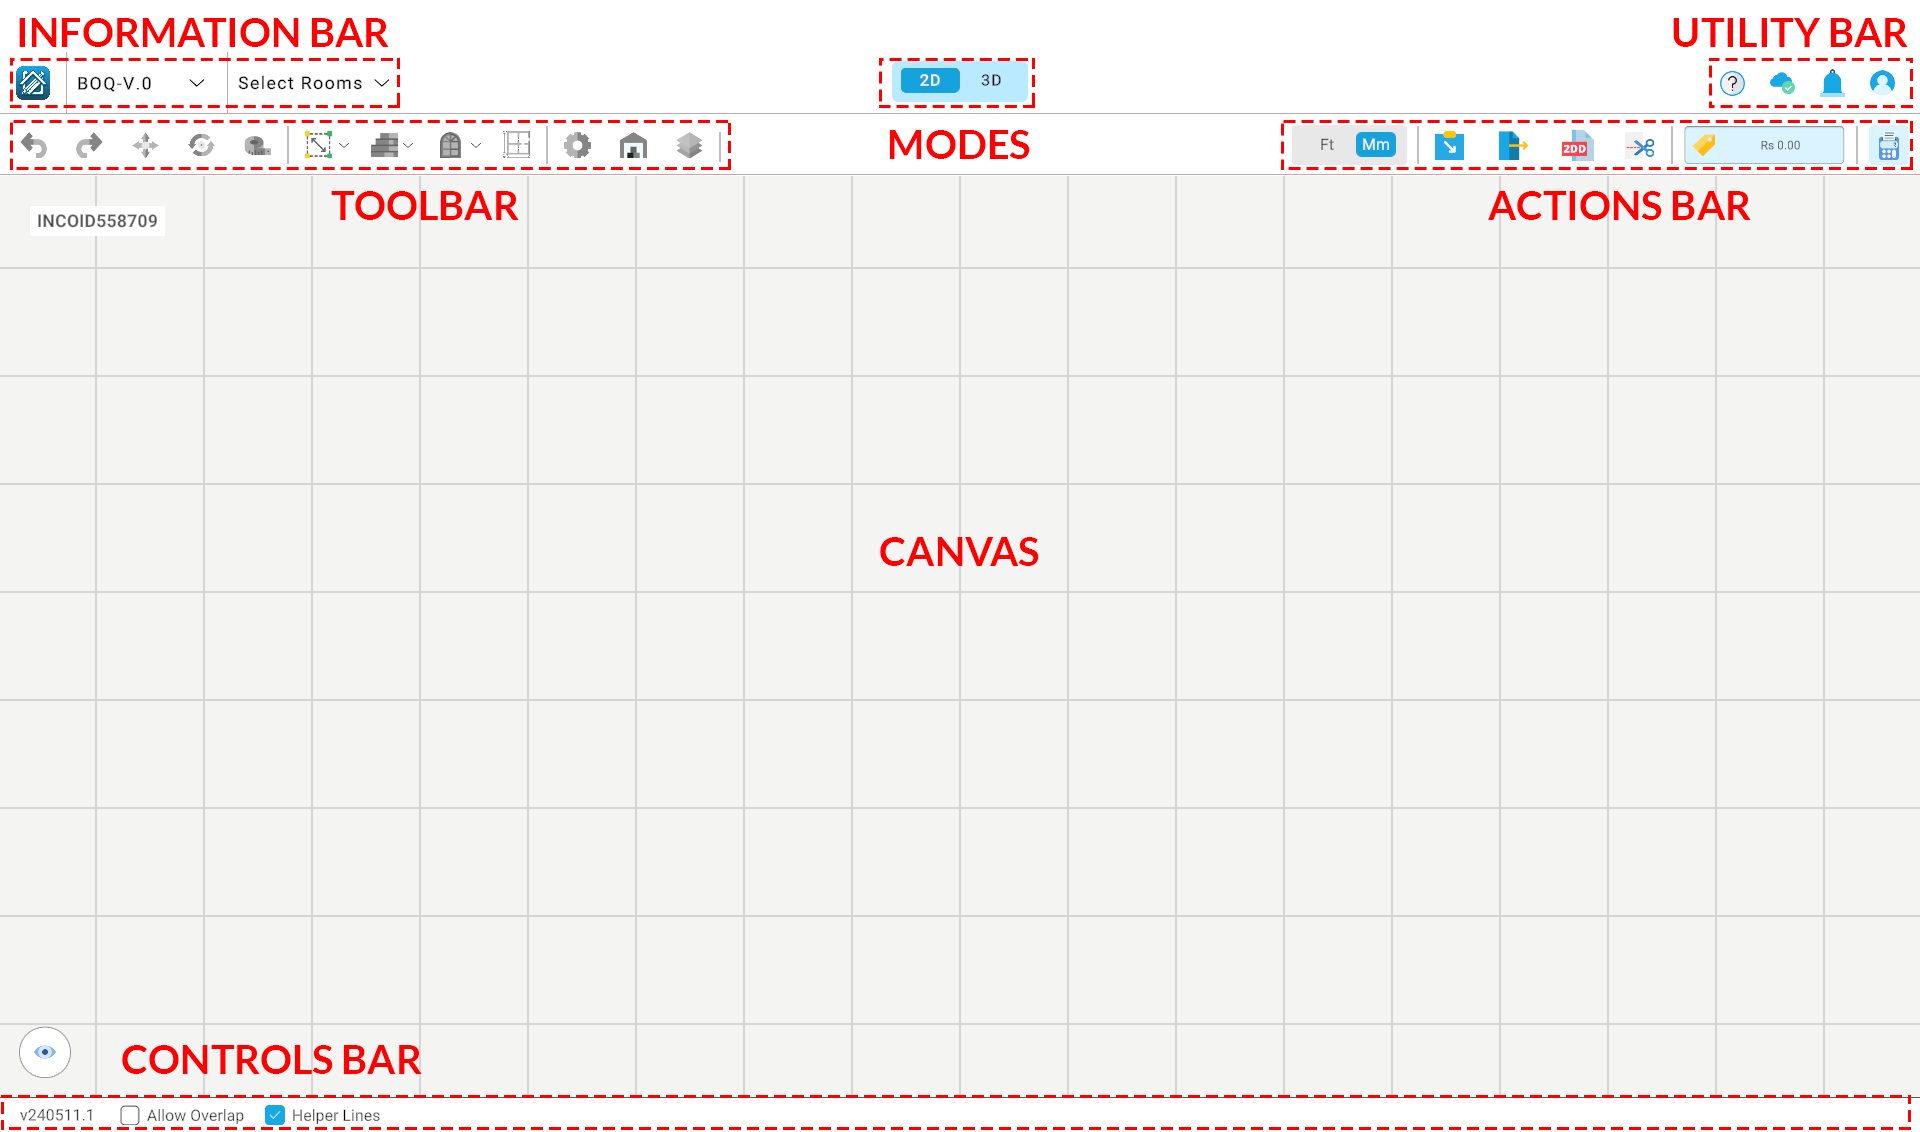
Information Bar
![]()
This bar contains the following from left to right:
- Home icon to go back to the Dashboard.
- Current BOQ version of the project and a dropdown to select through the various available BOQ versions.
- Currently selected room and a dropdown to select through the various created rooms in the project.
Modes

Switch between the 2D and 3D modes for your project.
Utility Bar
![]()
The Utility Bar in the Design mode has the same functionality as the Dashboard.
Toolbar
![]()
The toolbar contains all the Tools you would need to start creating your Design and then Edit it. Some of the tools available in the toolbar will differ in 2D and 3D modes. Hovering over a tool icon will show a Tooltip which indicates the name of the tool. Any tool icon in gray color indicates that the tool is currently ‘Disabled’ and you would need to select a room or object or module, depending on the functionality of the tool, to enable the tool. Any tool icon which is coloured indicates that the tool is currently ‘Enabled’ and can be used.
Actions Bar
![]()
This bar contains the following buttons from left to right:
- Toggle between units of measurement (Ft and Mm)
- Import: To import an external 3D model/ a room from another existing project/ Floor Plan
- Export: To export a 3D model of the Blocks model in FBX format
- Generate 2DD: To generate 2D Drawing for your created design.
- Generate Cutlist: To generate cutlist for modular work in your design.
- Pricing Summary: To see a consolidated pricing summary of your entire project and edit the same.
- Generate BOQ: To generate a BOQ for the created design.
Canvas
This is the workspace where you will be working in both 2D and 3D modes. This area will contain the floor plan you import, the rooms you create and everything inside them.
Controls Bar
![]()
This bar contains the following buttons from left to right:
- Current version number of Blocks you are running.
- Toggle for ‘Allow Overlap’ function: To toggle between a state of objects being allowed to be overlapped while movement/rotation/resizing and not being allowed the same.
- Toggle for ‘Show Helper Lines’ function: To toggle between a state of measurement helper lines being visible and not being visible when any object inside the room is selected.
- The right hand side of the bar will get populated based on the objects and tool selection combination. It will remain blank till the time no objects are selected.
Basic Tool functions
Let us now go through a brief about each tool available in the toolbar. The detailed usage and their shortcuts (if any) of the tools will be explained in the latter chapters.
![]() Undo | Shortcut - Ctrl + Z | Available in 2D and 3D:
Undo | Shortcut - Ctrl + Z | Available in 2D and 3D:
Undo your previous steps using this tool.
![]() Redo | Shortcut - Ctrl + Y | Available in 2D and 3D:
Redo | Shortcut - Ctrl + Y | Available in 2D and 3D:
Redo your previously undone steps using this tool.
![]() Move | Shortcut - M | Available in 2D and 3D:
Move | Shortcut - M | Available in 2D and 3D:
Move any selected objects like modules, props, structural entities, doors and windows but not rooms.
![]() Rotate | Shortcut - Q | Available in 2D and 3D:
Rotate | Shortcut - Q | Available in 2D and 3D:
Rotate any selected objects like modules, props and structural entities but not rooms, doors and windows.
![]() Measurement | Shortcut - T | Available in 2D and 3D:
Measurement | Shortcut - T | Available in 2D and 3D:
Measure any space inside your room like walls, modules, props etc. distances between and distances between any objects.
![]() Snap | Shortcut - S | Available in 3D only:
Snap | Shortcut - S | Available in 3D only:
Use this tool to accurately snap the following objects with their corner points:
- Modules to modules
- Modules to structural entities but not vice-versa.
- Props to structural entities but not vice-versa.
- Props to modules and vice-versa.
![]() Create Room | Available in 2D only:
Create Room | Available in 2D only:
Use it to create rooms in your project. You can use a free wall to create a room by drawing individual walls or predefined shapes in the dropdown for quickly making the most common room shapes.
![]() Structural Entities | Available in 2D only:
Structural Entities | Available in 2D only:
Make the following structural entities inside your rooms:
- Column
- Beam
- Slab
- Niche
- Cutout
![]() Door and windows | Available in 2D only:
Door and windows | Available in 2D only:
Place doors and windows on the walls of your rooms.
![]() Edit Room | Available in 2D only:
Edit Room | Available in 2D only:
Use it to edit the room dimensions and shape by the following means:
- Drag wall: Use it to drag an existing wall in its plane.
- Split wall: Use it to split an existing wall vertically at any given point.
- Join wall: Use it to join any 2 coplanar walls.
![]() Settings | Available in 2D and 3D:
Settings | Available in 2D and 3D:
Use this tool to set various material, finish, handle and hardware properties for your modular work and change the same anytime even after modules have been added.
![]() Warehouse | Available in 2D and 3D:
Warehouse | Available in 2D and 3D:
This is the store for your project. Use it to add modules, props, services and store products.
![]() Layers | Available in 2D and 3D:
Layers | Available in 2D and 3D:
All your objects are automatically segregated into layers of their own based on their type. Use this tool to turn individual layers on and off.
![]() Visualisation | Available in 3D only:
Visualisation | Available in 3D only:
Use this tool to add and then edit the following:
- Paint on walls, ceiling and structural entities
- Wallpaper on walls, ceiling and structural entities
- Flooring on the floor
- Wall tiling on walls
![]() Lights | Available in 3D only:
Lights | Available in 3D only:
Use it to control the light settings of the default light and to add more lights in the room.
![]() Add Skirting | Available in 3D only:
Add Skirting | Available in 3D only:
Use it to generate Skirting and countertop on modules and independent worktop.
![]() Camera Views | Available in 3D only:
Camera Views | Available in 3D only:
Set the view of your model to standard camera views and toggle between Perspective and Parallel Projection views.
![]() Camera | Available in 3D only:
Camera | Available in 3D only:
Use it to capture the current view of the model.
![]() Gallery | Available in 3D only:
Gallery | Available in 3D only:
This serves as the storage location for all captured views across individual rooms. Views are organized by room and can also be downloaded directly from the Gallery.